Monday 27 June 2011

What is it About Ceiling Fans?

What is it about ceiling fans?  I am grateful that we have ceiling fans.  I would not be able to sleep on a Brisbane summer night without one.


But there is something about my ceiling fans that is bugging me.  I hate the brass stripe and the brass screws.  I hate that they have discoloured over time and look yellow.  I hate that this bothers me.  Is it because when you lie in bed you stare up at the ceiling fan?


I decided I either needed to be grateful that I had ceiling fans and stop complaining about the way they look, or be grateful that I can change them - so I did.  I painted the blades with a spray gloss paint in white, and the metal fan housing with white gloss Kill Rust metal paint.


So much better - all white now!

I have lived with this brass fan in my master bedroom for 10 years.  It's the only brass fan in the whole house.  I guess the people who built the house wanted to make a feature of it (they succeeded).  We only have 8 foot ceilings so I just want it to blend into the ceiling so it doesn't make the room feel small.

Before


After


I am particularly grateful to some of the wonderful blogs out there that give detailed instructions on how to complete some of these unusual DIY projects, and so inspire others to believe that they can also do it.  If it wasn't for them, I'd still be living with my ugly brass fan for another 10 years.  I'm grateful for that!

Friday 24 June 2011

Taming the Paper

My home office is in chaos.  There is paper everywhere.  I am too embarrassed to post a photo of the office and I am forever closing the door to hide the clutter.  Well I can't turn a disaster zone into a perfect setting overnight, so I will take baby steps.  Step 1 - Create an 'In Box'.

The problem with a paper tray is that you continue to pile papers on top of each other until the bill you were meaning to pay is now at the bottom of the pile and is 2 weeks overdue.  The key is to file the papers vertically so you can see them easily and there is no top or bottom to the pile.


So I grabbed a desktop file box and some pretty coloured files.


I think they are beautiful and the were from Woolworths (supermarket).


Home Manager sounded like a good name for the file box rather than In Tray.


I made labels for the suspension files - Contacts, To Do, Follow Up, Shopping, School, Bills, Receipts and File.  Then I went through the mountain of paper on my desk, in the kitchen, beside the lounge, and on the floor and sorted each piece into one of the folders or into the rubbish bin.  I paid the overdue bills, completed school forms, and marked dates on the calendar.  I think it's a good start.


Wednesday 22 June 2011

Which paint colour?

Now this shouldn't be a difficult decision. I can easily help other people choose paint colours for their homes, yet when it comes to my own place I struggle to make the decision.  Maybe there's an emotional attachment, or maybe it's because I do the painting myself that I don't want to make a mistake and have to repaint the room?


Our house is painted in Taubman's 'Arizona White' - every door, window frame, skirting board and wall.  We have aluminum windows in Colorbond 'Paperbark', which is a beige colour.  I often see magazine pictures with walls painted in soft grey/beige tones accented by white timber windows and french doors.  Sigh... but that won't work for me in this house.  I'm not unhappy with the 'Arizona White' it's just that I want to lighten the walls up a bit in some of the rooms.  I bought a 1 litre pot of 'Arizona White' in half strength and one in quarter strength, and now I have walls all over the house with patches of these paints so I can see how they look in different light.  Surely it not a hard decision?


So I'm going to paint the walls in quarter strength ... I think?

Monday 20 June 2011

I'm Grateful for My Car

I am lucky.  I have a nice car.  My car is comfortable and has all sorts of nice features.  I take care of my car in the hope that it will protect and take care of me.  It's a lot different to the first car I owned.  My first car was a 1976 yellow Volkswagon Golf with no power steering, no electric windows or ipod connection and a rear window that let in the water when it rained.

My mum keeps a small plastic figurine of Ronald McDonald in her car.  It was one of those free giveaways you get when you buy a meal.  Anyway, she had an old manual car that had a choke that you had to pull out when you started it.  The problem was it used to slide back whenever she pulled it out.  On cold Melbourne mornings you needed to keep the choke out until the car engine warmed up, so she use to pull the choke out and then push Ronald down so the choke sat between his legs and it stopped it slipping back. 


 Mum has a lovely car now but she keeps the Ronald figurine in her car to remind her where she's come from and to be grateful for the car she has now.

No matter what your mode of transport is, appreciate it.  At least you're going somewhere.

Friday 17 June 2011

Some Bed Curtains - Five Years in the Making

In 2006 my husband went on a shopping centre tour of the United States (dream job huh?).  The one thing I asked for was the latest Pottery Barn catalogues (and some duty-free perfume).  On page 100 of the Pottery Barn Kids catalogue I saw this....

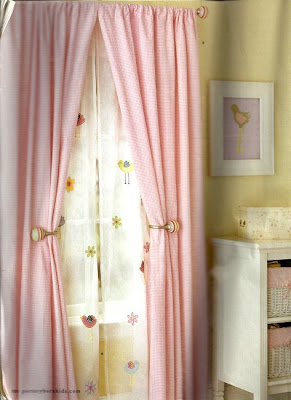
Pottery Barn Fall 2006 Catalogue

Oh how my daughter would love those curtains.  Back then Pottery Barn didn't ship to Australia, and there was nothing this pretty in the shops here.  I thought one day I'll make them.

Months (or more) rolled by but eventually I got motivated and found some plain white sheer curtains from IKEA, some good quality felt in blue, yellow, light pink and dark pink, and some bright DMC embroidery thread in co-ordinating colours.  I made templates for a flower, bird and butterfly and carefully cut out the felt.  Having never really done any applique/embroidery before I wasn't sure what to do next, so I packed it all away in a bag and conveniently forgot about it.


Then we were transferred to the UK for 2 years and everything went into storage.  I forgot all about these little felt shapes until I pulled out my sewing gear a few weeks ago.  Oh dear.  My little 5 year old girl is now 9.  My window of opportunity was closing.  Make these cute curtains now so she can enjoy them before we enter the pre-teen world of Justin Bieber.


So I grabbed my needle and DMC thread and started stitching.  I used a simple running stitch and some french knots (which I had to watch a You Tube video to work out how to do - Martha's pictures were confusing).


Once all the felt shapes were made, I played around with the placement.  I also cut small lengths of pink & white polka dot ribbon to tie the curtain to the curtain rail of the bed crown.  Then I glued the felt shapes to the curtain using clear drying washable fabric glue and finished the rest of the hand embroidery.


I had some pretty grosgrain ribbon which I sewed down the inside edge of each curtain.  Then I simply hemmed and pressed the curtains ready to hang.


We centred the bed crown above my daughter's bed and attached it to the wall.  Not a wall stud in sight of course, so we used many wall anchors to ensure it would not fall down.  Then with much anticipation we hung the curtains.


The bed crown was part of the Brittany collection at Recollections/Early Settler


Lastly I made this pillow.  It's white cotton on the front, hot pink on the back with green ric rac sewn into the seams and an iron-on applique that I like to call Shopping Girl.  So she has something cute and something a bit more grown up.

I can tell you that making these bed curtains was a labour of love and a long time in the making, but I am thrilled with them and so is my daughter.  When she does grow too old for them I am going to store them away and hopefully one day she might hang them above the cot (crib) of her daughter.  Made with Love.


Sharing all my hard work with these beautiful ladies:

French Country Cottage - Feathered Nest Friday
My Romantic Home - Show & Tell Friday

and

The Shabby Nest - Frugal Friday
Freckled Laundry - Air Your Laundry
Tattertots & Jello - Weekend Wrap Up Party

Wednesday 15 June 2011

Serving Up Chalkboard

I own a book called Table Inspirations by Emily Chalmers (Available from Amazon here).  It is filled with lots of ideas for decorating your dining table and absolutely beautiful photography.  In the photo below a piece of slate with chalk writing is used as a place mat.


Source Table Inspirations by Emily Chalmers
 Slate is a little hard to come by in Brisbane but I thought I could probably achieve something similar with an MDF place mat and some chalkboard paint.


Firstly I had to seal the fibreboard (birch) with a sealer/undercoat.  I use Taubmans 3 in 1. Then I gave the place mats 2-3 coats of chalkboard paint. 

When they were dry I seasoned the chalkboard by rubbing it all over with the side of a piece of chalk, and then wiping it clean.  I added some felt (or you could use cork) feet to the bottom of the place mat to protect the surface of the table.  This is the end result.....


Hmmmm.... A little boring I think.  So I grabbed a rubber stamp and some Stayzon Opaque white ink and added this.


A damask stamp to the bottom corner.


A scroll corner stamp.

I found the mini easel in the discount store.  It was a bright gold colour, so it got a coat of white paint.


I can imagine painting a long strip of wood to use as a table runner down the centre of a table, or large square place mats.  You could place a small mason jar of chalk on the table so your guests could play naughts and crosses (tic, tac, toe) or write messages.  You could stamp any design onto the chalkboard - hydrangea, bird, chandelier ....  Oh the possibilities.

P.S  The little chalkboard labels on twine were from Somerfield - a funny little supermarket in London.

Showing my crafty side here:


Tuesday 14 June 2011

And It Was Half Price

On Friday I was visiting a friend in the bayside suburb of Wynnum, so I decided to have a quick look through all the op shops (charity shops) while I was there.  Wynnum has the highest concentration of thrift shops in the whole of Brisbane.  I don't know why?  In the end I made two purchases.


The tray is a reproduction but it is A1 silver plate and nice and heavy.  I liked the leaf scroll pattern around the edges and figured if I wasn't able to remove the tarnish I could always paint it.  It was $10 but when I went to the counter the lady said "It's 50% off bric-a-brac so that will be $5".  Bargain!

Armed with my trusty Autosol car polish, I did a test patch on the back to see how it would turn out.  This car polish is amazing.  It does a much better job that silver or brass polish.  I used it to restore my antique brass bed, and the result was almost too new and shiny.


Yes I think it will come up beautifully, and it did.


I also bought 3 lovely old tourist pictures of Rome for $1 each.


There's the Colosseum, Trevi Fountain, and The Piazza Navona.


This is stamped onto the back of each framed picture.  I figure if somebody went to the trouble of packing these in their suitcase and bringing them half way around the world back to Australia, then they are special.  I wonder who owned them and when they bought them?  I am going to hang them in the guest bedroom.


Thursday 9 June 2011

He Finally Gets It

On Saturday night my husband took our son and his mate up to the video store to hire a movie.  He came back with this.


He found it on the side of the road (you know how people put stuff on the kerb in the hope that someone will take it) and brought it home.  That is something I never dreamed he would do.  I think he finally gets the whole decorating on a budget thing.

He knew that I had been working hard to restore and paint an old desk for our daughter, so he grabbed this chair so she could use it at her desk.  It's got a little piece missing from one leg and has some white paint splashed on the seat but it is as solid as a rock!  I am going to sand and paint it, then make a pretty seat cushion.


Well done honey!

Wednesday 8 June 2011

Ahh Tissue

In my effort to make the guest bedroom (or in fact my whole house) a stylish setting, I am trying to make things both practical and pretty.  So when I decided to put a box of tissues in the guest bedroom (practical), I couldn't bring myself to put a store-bought printed tissue box (not pretty) in it.  Time for some decorative cover-up.


I had some linen fabric in my sewing box and I attached some iron-on interfacing to stiffen it.  I traced around all four sides of the tissue box with a fabric marker and added 1.5cm (5/8") seam allowance. 


Then I traced around the top of the box and marked a circle cut out, again leaving a seam allowance.  I sewed all 4 side seams together. I then sewed the top piece to all the side pieces, and over locked all the edges. I turned up the bottom hem and stitched it in place.


I cut out a circle for the top section, snipped the seam allowance and used fabric glue to fold it back.  When it was all done I pressed all the seams with the iron. 


For decoration, I raided my button jar and randomly glued buttons to the front in the shape of a heart.


I am really happy with the way it turned out.  It took less than an hour to make and I think it is definitely practical and pretty.


Sharing at:

As always with Sarah at
A BEACH COTTAGE

and for the first time with

Tip Junkie's - Tip Me Tuesday

Related Posts Plugin for WordPress, Blogger...